> ## Documentation Index
> Fetch the complete documentation index at: https://docs.claw.boo/llms.txt
> Use this file to discover all available pages before exploring further.
# Quickstart: the OpenClaw Gateway
> Install Clawboo, connect the native runtime, then add OpenClaw by detecting, installing, and configuring it, starting the Gateway, and approving the device.
By the end of this tutorial you'll have a running OpenClaw Gateway connected to Clawboo, set up from the onboarding wizard's **Add more runtimes** step. Onboarding is native-first, so you connect the native runtime first, then add OpenClaw through its setup detour: detect your environment, install OpenClaw if needed, configure a model provider, start the Gateway, and approve the one-time device pairing. Once OpenClaw is connected you deploy an OpenClaw team from the dashboard.
This is the OpenClaw path. Unlike the other four runtimes, [OpenClaw](/runtimes/openclaw) is a *connected substrate*; Clawboo connects to a running OpenClaw Gateway (a WebSocket server that hosts OpenClaw agents), rather than installing and spawning a CLI per task. If you want a working team with no Gateway at all, the [native runtime quickstart](/getting-started/quickstart-native) is faster: paste one provider key and you're done.
These docs describe Clawboo **v0.3.1**, the current release.
## Prerequisites
* **Node.js 22 or newer**: Clawboo's `engines` field requires `node >=22.0.0`.
* **`npm` on your `PATH`**: the install step runs `npm install -g openclaw@^2026.5`.
* **A provider API key** for whichever model provider you'll configure OpenClaw with (Anthropic, OpenAI, Google, OpenRouter, and others). Ollama needs no key, but it must be running locally.
* No prior OpenClaw install is required; the wizard can install, configure, and start one for you.
OpenClaw is a separate project; Clawboo connects to a Gateway you run locally, it does not bundle OpenClaw. The wizard pins the install to `openclaw@^2026.5` deliberately: Clawboo's gateway client advertises connect protocol `minProtocol: 3, maxProtocol: 4`, and the pin keeps a fresh user on a protocol-compatible OpenClaw.
## Steps
### 1. Install and launch Clawboo
Install Clawboo globally, then run it:
```bash theme={"theme":{"light":"github-dark","dark":"github-dark"}}
npm install -g clawboo
clawboo
```
Prefer not to install? `npx clawboo` runs the latest instead. Either way, the CLI prints the Clawboo logo, does a quick informational probe of the OpenClaw Gateway port (`localhost:18789`), starts the bundled dashboard server, then opens your browser at the discovered URL.
**Expected result:** your terminal shows `Dashboard started` and `Clawboo opened at http://localhost:18790` (or the next free port in the `18790–18809` range), and the dashboard loads. Because this is a fresh machine, the onboarding wizard appears.
### 2. Click "Get Started"
The first screen is the welcome splash: the Clawboo wordmark, the line "Your AI agents, visible.", and a **Get Started** button.
**Expected result:** clicking **Get Started** advances to the native connect step. There is no "pick a runtime" screen; native is the default, and OpenClaw is added afterward.
### 3. Connect the native runtime, then choose "Set up OpenClaw"
Onboarding is native-first, so you connect the built-in native runtime before adding OpenClaw. On the **Connect your AI provider** step, pick a provider and paste a key (or select **Ollama** for a keyless local model), then click **Continue**. Clawboo stores the key and advances to the **Add more runtimes** step (you pick and deploy a team in a later step). (The native connect step is covered in full in [Quickstart: native](/getting-started/quickstart-native).)
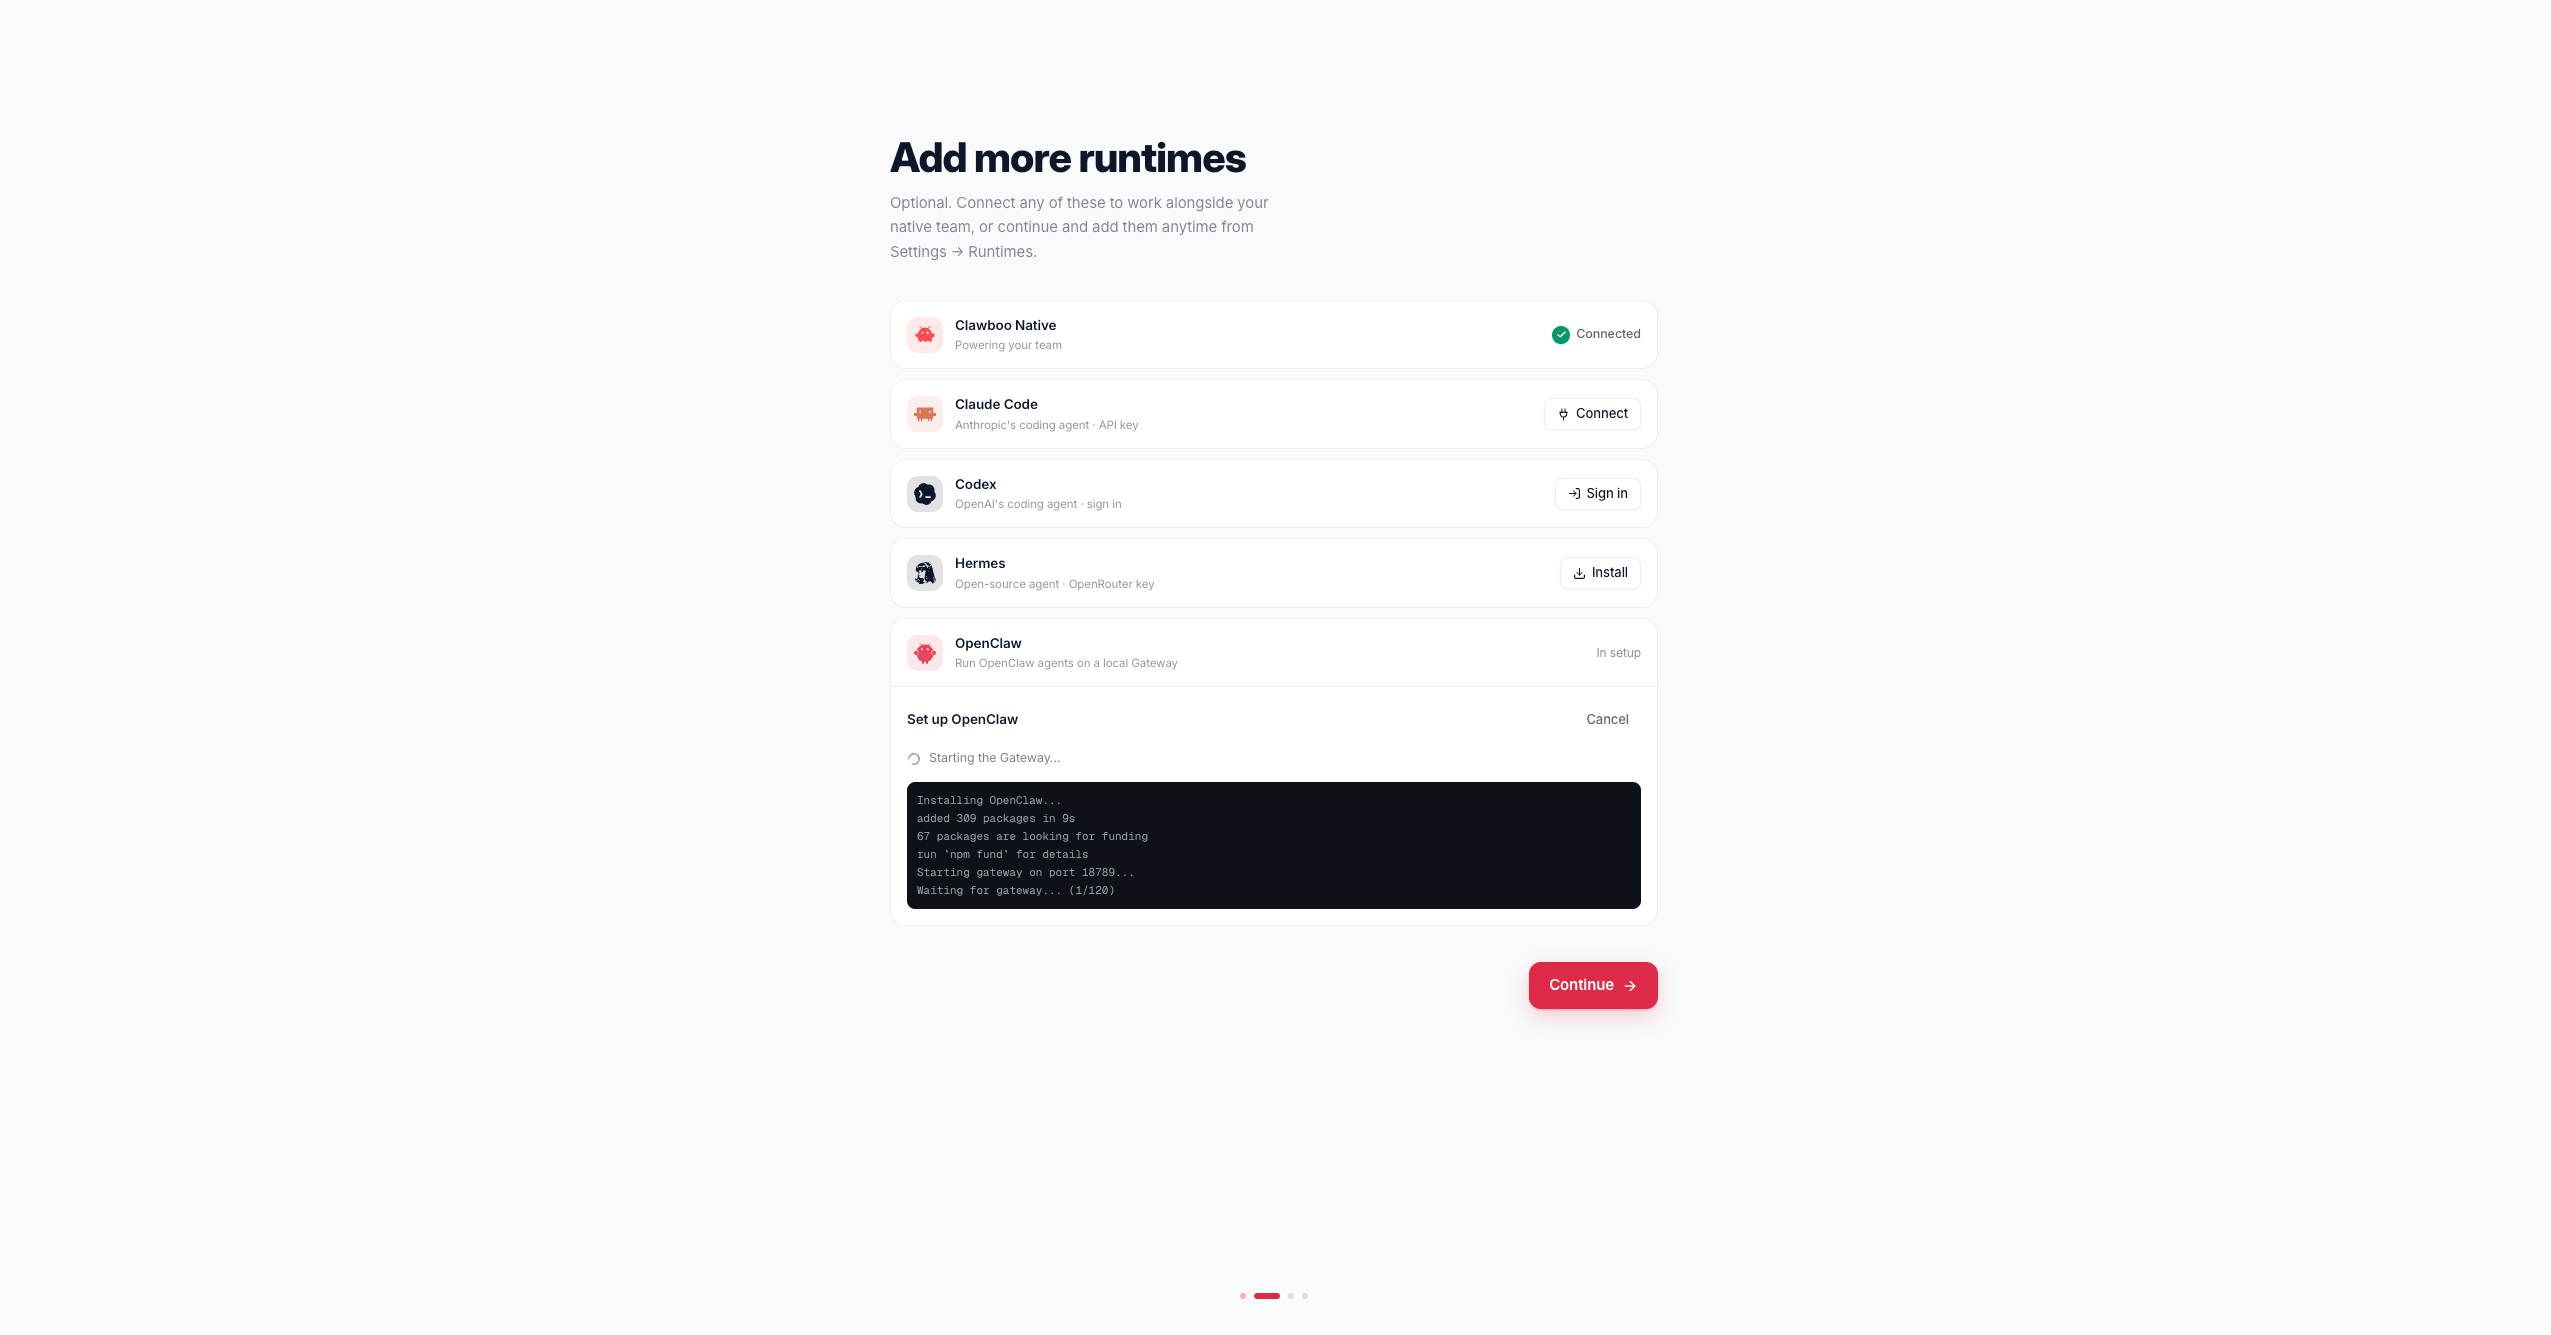
On **Add more runtimes**, find the **Set up OpenClaw** row and click **Set up OpenClaw**.
**Expected result:** the wizard enters the OpenClaw setup detour at the **System Check** step. Everything in steps 4 to 7 below happens inside this detour, which returns you to **Add more runtimes** when it's done.
 ### 4. Let Clawboo detect your environment
The **System Check** step fetches `GET /api/system/status` on mount and shows an animated three-item checklist: **Node.js**, **OpenClaw**, and **Gateway**, each revealed in sequence:
* **Node.js**: a green check when your version is 22 or newer (a red X with a Download link otherwise).
* **OpenClaw**: green with the detected version when the `openclaw` binary is on your `PATH`; an amber dot reading "Not found" otherwise.
* **Gateway**: green "Running on :18789" when a managed Gateway process is alive or the port probes reachable; amber "Not running" otherwise.
A single **call-to-action** button at the bottom reflects what's missing. On a fresh box it reads **Install OpenClaw**; once OpenClaw is installed but unconfigured it reads **Set Up OpenClaw**; once configured but the Gateway is down it reads **Start Gateway**; when everything is green it reads **Continue** and auto-advances after \~1.5 seconds.
**Expected result:** the checklist resolves, and the CTA tells you the next action. If everything was already green, you skip ahead to the team step (step 8); otherwise click the CTA to proceed through the steps below.
If you already run a Gateway on another machine, click **Connect to remote gateway →** at the bottom of System Check to enter a Gateway URL and token directly instead of installing locally.
### 5. Install OpenClaw
If OpenClaw isn't installed, clicking **Install OpenClaw** opens the **Installing OpenClaw** step, which streams `POST /api/system/install-openclaw`, a Server-Sent Events stream that runs `npm install -g openclaw@^2026.5` and shows live `npm` output in a terminal log.
The stream emits typed events:
| Event `type` | Payload | Meaning |
| ------------ | ---------------------------- | -------------------------------------------------------- |
| `progress` | `{ step, message }` | Phase marker |
| `output` | `{ line }` | A line of `npm` output |
| `error` | `{ code, message }` | `EACCES`, `SPAWN_THROW`, `SPAWN_ERROR`, or `EXIT_
### 4. Let Clawboo detect your environment
The **System Check** step fetches `GET /api/system/status` on mount and shows an animated three-item checklist: **Node.js**, **OpenClaw**, and **Gateway**, each revealed in sequence:
* **Node.js**: a green check when your version is 22 or newer (a red X with a Download link otherwise).
* **OpenClaw**: green with the detected version when the `openclaw` binary is on your `PATH`; an amber dot reading "Not found" otherwise.
* **Gateway**: green "Running on :18789" when a managed Gateway process is alive or the port probes reachable; amber "Not running" otherwise.
A single **call-to-action** button at the bottom reflects what's missing. On a fresh box it reads **Install OpenClaw**; once OpenClaw is installed but unconfigured it reads **Set Up OpenClaw**; once configured but the Gateway is down it reads **Start Gateway**; when everything is green it reads **Continue** and auto-advances after \~1.5 seconds.
**Expected result:** the checklist resolves, and the CTA tells you the next action. If everything was already green, you skip ahead to the team step (step 8); otherwise click the CTA to proceed through the steps below.
If you already run a Gateway on another machine, click **Connect to remote gateway →** at the bottom of System Check to enter a Gateway URL and token directly instead of installing locally.
### 5. Install OpenClaw
If OpenClaw isn't installed, clicking **Install OpenClaw** opens the **Installing OpenClaw** step, which streams `POST /api/system/install-openclaw`, a Server-Sent Events stream that runs `npm install -g openclaw@^2026.5` and shows live `npm` output in a terminal log.
The stream emits typed events:
| Event `type` | Payload | Meaning |
| ------------ | ---------------------------- | -------------------------------------------------------- |
| `progress` | `{ step, message }` | Phase marker |
| `output` | `{ line }` | A line of `npm` output |
| `error` | `{ code, message }` | `EACCES`, `SPAWN_THROW`, `SPAWN_ERROR`, or `EXIT_` |
| `complete` | `{ success: true, version }` | Install finished |
On `complete`, the step shows "Installed! v…" and auto-advances to configuration after \~1 second.
**Expected result:** the terminal log fills with `npm` output, then the step reports the installed version and moves on.
A global `npm install` can fail with `EACCES` ("permission denied"). The stream emits an `error` event with code `EACCES`, and the step shows a **How to fix** panel suggesting a Node version manager (nvm/fnm) or Homebrew. Prefer either of those over `sudo`.
### 6. Configure a provider
The **Set Up OpenClaw** step shows a provider grid: four primary cards (Anthropic, OpenAI, Google, Ollama) plus a "More providers" section (OpenRouter, xAI, Groq, and others). Pick a provider, paste your API key into the **API Key** field (the eye icon toggles visibility), and optionally choose a **Default Model** from the dropdown. Ollama needs no key; selecting it hides the key field.
Clicking **Configure & Start** posts to `POST /api/system/configure-openclaw` with `{ provider, apiKey?, model? }`. The handler:
* writes OpenClaw's `openclaw.json` in **local mode** (`gateway.mode: 'local'`, token auth, agent-to-agent tooling enabled with `tools.sessions.visibility: 'all'`) and a default model under `agents.defaults.model.primary`;
* generates a Gateway auth token and writes it into OpenClaw's `~/.openclaw/.env` as `GATEWAY_AUTH_TOKEN`, alongside your provider key;
* saves Clawboo's own `settings.json` (`gatewayUrl`, `gatewayToken`).
The handler returns `{ ok: true, gatewayUrl }`. The raw token is **never returned in the response body**; it's persisted server-side, and the same-origin proxy injects it on connect.
**Expected result:** the button shows "Configuring…", then the wizard advances to the Gateway-start step.
### 7. Start the Gateway and approve the device
The **Starting Gateway** step posts `POST /api/system/gateway` with `{ "action": "start" }`, an SSE stream that spawns the Gateway detached, polls until the port (`18789`) is reachable (up to 60 seconds), syncs the token, and reconnects Clawboo's server-side agent source. On the `complete` event, the step auto-connects a Gateway client through the same-origin WebSocket proxy.
On OpenClaw **2026.5.x and later**, that first connect **fails with `NOT_PAIRED`**; a new device lands in OpenClaw's pending list and must be approved by a human before it can connect:
```
GatewayResponseError { code: 'NOT_PAIRED', message: 'pairing required: device is not approved yet' }
```
Instead of an error, the step swaps in an **Approve this device** card. Click **Approve this device**. The card hits `POST /api/system/approve-device`, which performs a two-step shell-out against the OpenClaw CLI:
1. `openclaw devices approve --latest` runs in **preview** mode: it prints `Approve this exact request with: openclaw devices approve ` and exits non-zero. Clawboo regex-extracts the UUID from the captured output.
2. `openclaw devices approve ` performs the actual approval.
On success, the step automatically retries the original connect with the same URL and token, and the connection completes.
**Expected result:** the mascot pulses while the Gateway starts, the **Approve this device** card appears, and after you click it the status flips to **Connected!** The detour then returns you to the **Add more runtimes** step, now showing a **Connected** pill for OpenClaw.
You can pair from a terminal instead: run `openclaw devices approve --latest` to see the request id, then `openclaw devices approve `. The approval card surfaces this manual fallback too.
### 8. Finish onboarding, then deploy an OpenClaw team
Back on **Add more runtimes**, click **Continue**. The wizard advances to the **Team** step, where you pick a starter team from the marketplace and deploy it. During onboarding every agent defaults to **Clawboo Native**; now that the Gateway is connected you can switch any member to **OpenClaw** from its runtime picker in the customize step.
Then the **Your team is ready** screen shows the roster and a **"Led by ..."** badge for Boo Zero; click **Open my dashboard**. You land in the dashboard connected to the Gateway ("gateway" mode), in your new team's group chat, which opens on a one-time **introduce yourself** screen.
To build a team of OpenClaw agents, open the **Marketplace** (or **+ Create team** in the leftmost sidebar), pick a template, and choose **OpenClaw** as the runtime for its members. Deploy creates the team and its agents: it `POST /api/teams` to create the team, writes each agent's SOUL.md, IDENTITY.md, TOOLS.md, and an enhanced AGENTS.md with the team roster and collaboration protocol, assigns each agent to the team, sets the team-internal lead when one is detected, and, when any agent has `@mention` routing, enables agent-to-agent coordination in the Gateway config. See [Deploy your first team](/getting-started/first-team) for the full team-building flow.
**Expected result:** the new team appears in the sidebar, connected to the Gateway, and opens directly in its group chat.
## What you should see
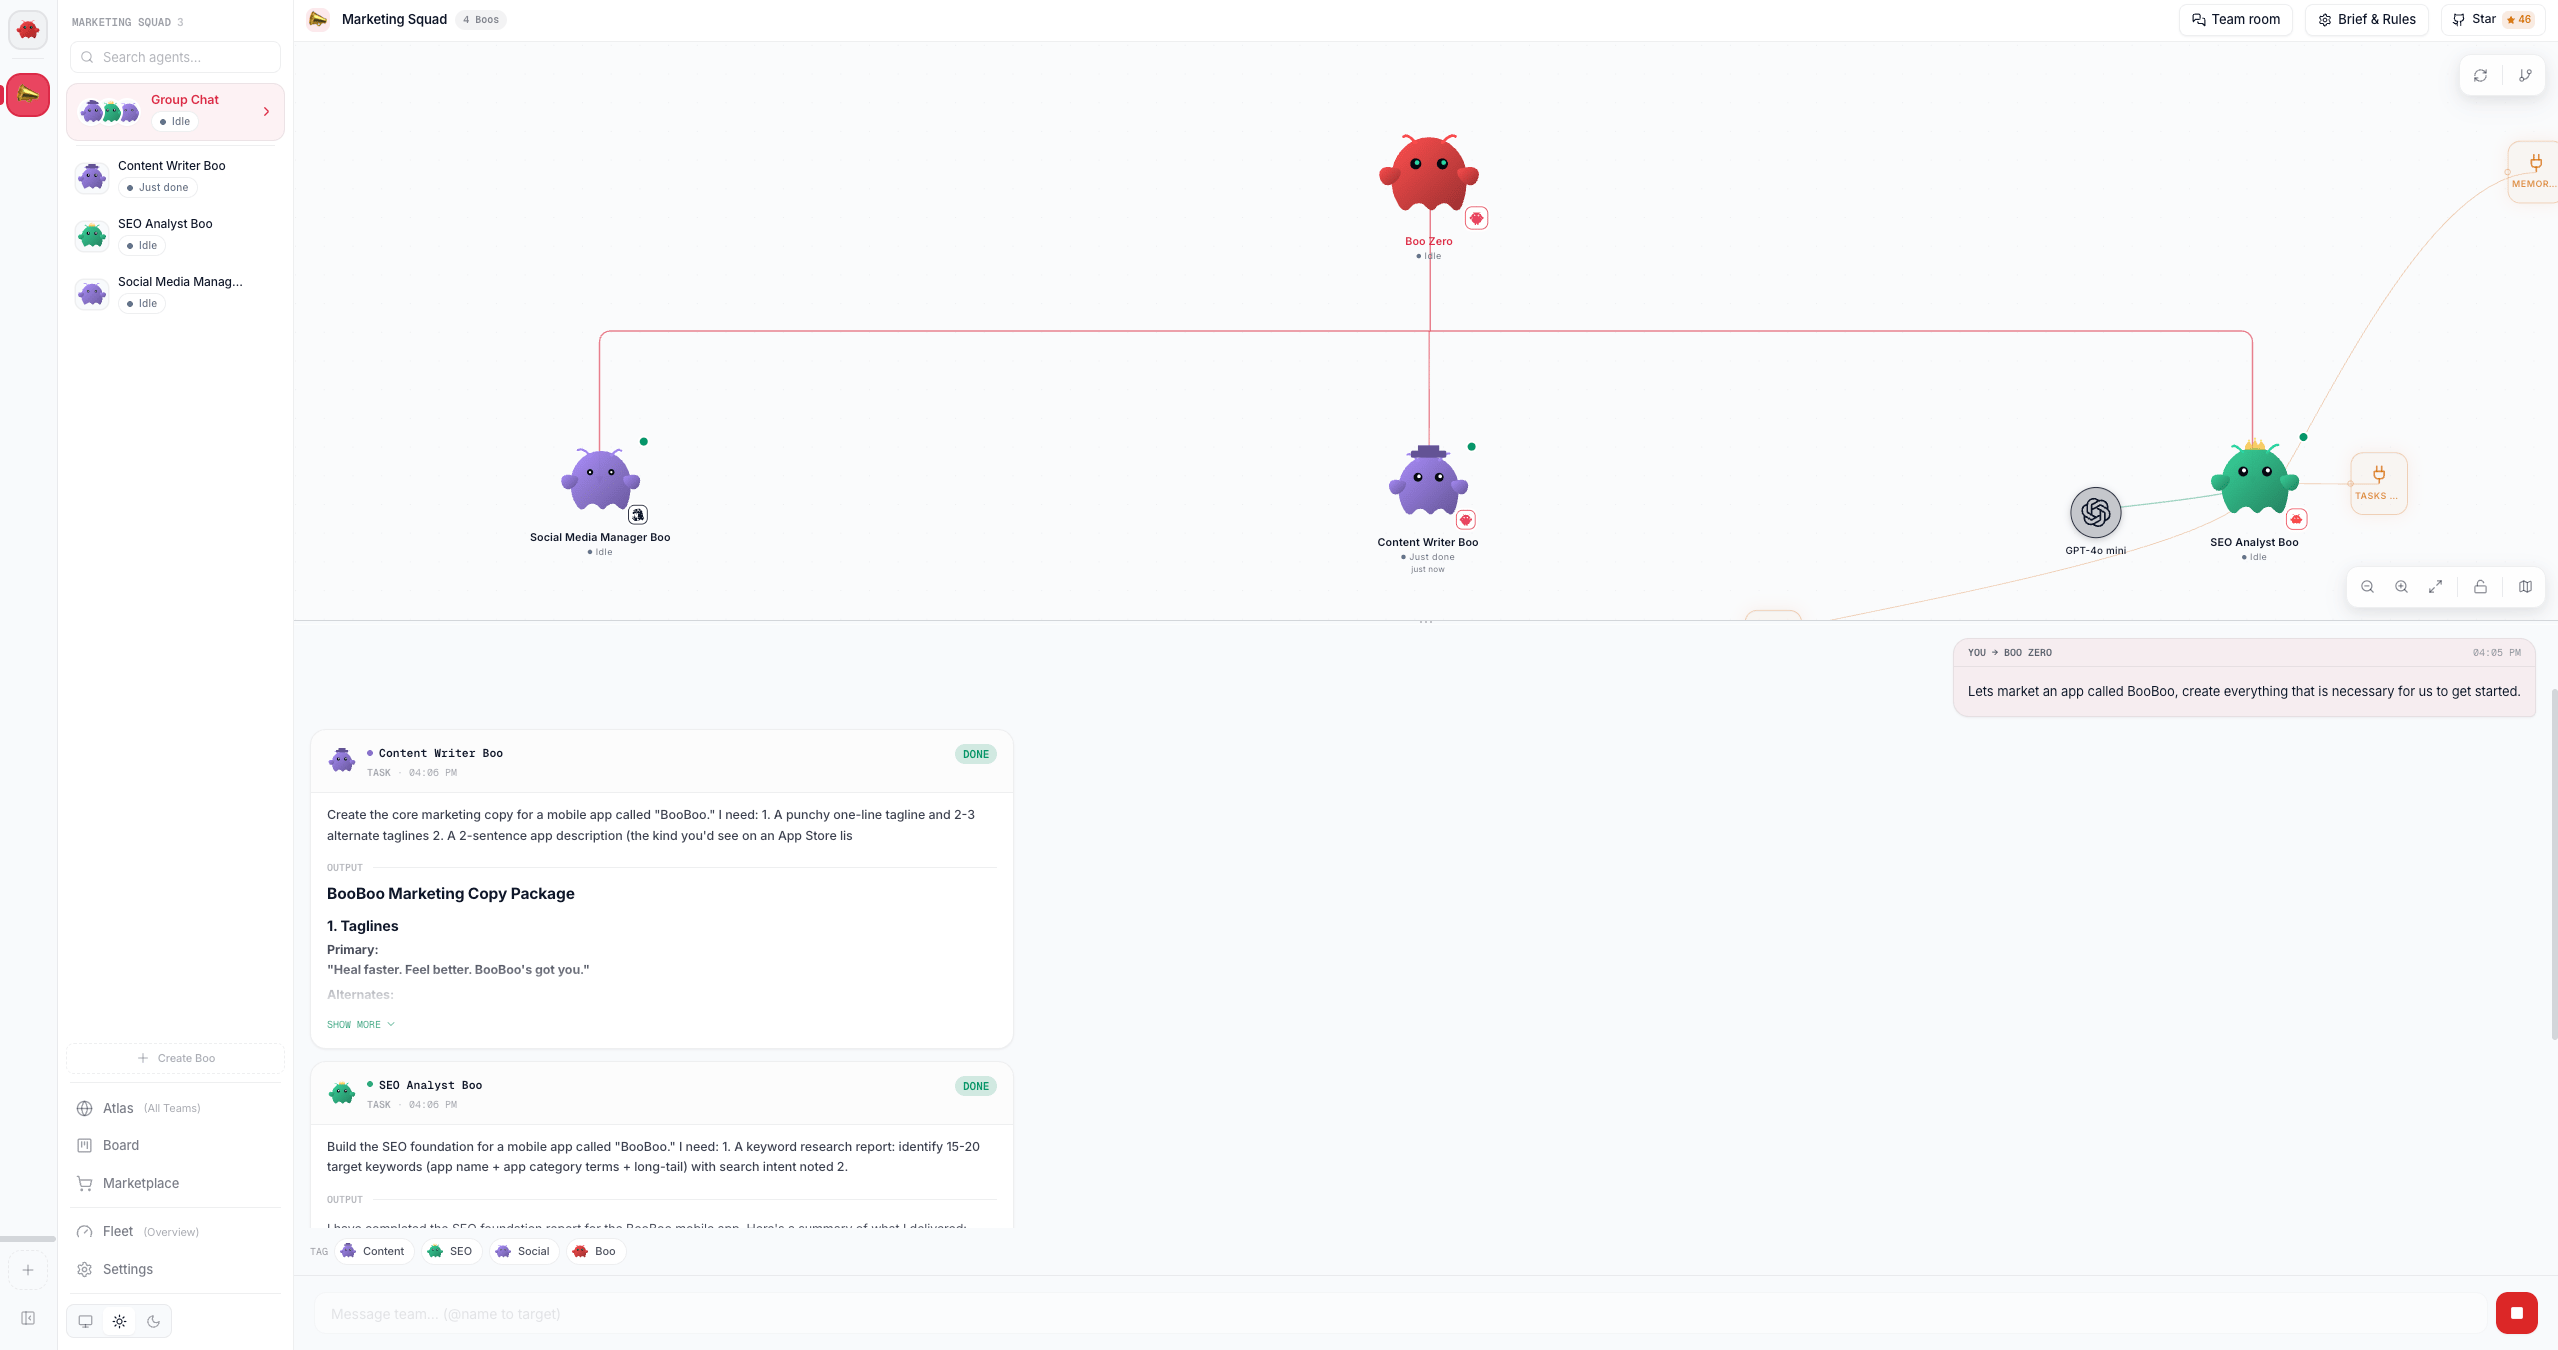
The dashboard opens connected to the Gateway, with the team you deployed in view and OpenClaw available as a runtime you can build teams on. Once you deploy an OpenClaw team, its Boos are ready to collaborate.
The team space looks like this once you start collaborating:
 ## What just happened
The wizard's Add-runtimes detour walked the full OpenClaw setup: it detected your environment, installed and configured OpenClaw with your provider key, started the Gateway, and approved this device for pairing. Once the Gateway came up, Clawboo opened two connections to it: a browser-side same-origin proxy connection for the chat/execution stream, and a server-side connection that mirrors the Gateway's agent list into SQLite (the [registry of record](/appendices/glossary), so the fleet survives the Gateway being down). Deploying an OpenClaw team from the dashboard then creates real OpenClaw agents and wires their routing, so they can delegate to each other over the Gateway.
## Next steps
* [Deploy and watch your first team collaborate](/getting-started/first-team)
* [Tour the dashboard: Atlas, Ghost Graph, and the view modes](/getting-started/dashboard-tour)
* [The OpenClaw runtime in depth: connections, channels, memory scope](/runtimes/openclaw)
* [System API reference: status, install, configure, gateway, device](/reference/rest-api/system)
* [Concept: the agent model and the five runtime classes](/concepts/agent-model)
Clawboo is free and open source. A star is the best way to support the project and helps other people find it.
## What just happened
The wizard's Add-runtimes detour walked the full OpenClaw setup: it detected your environment, installed and configured OpenClaw with your provider key, started the Gateway, and approved this device for pairing. Once the Gateway came up, Clawboo opened two connections to it: a browser-side same-origin proxy connection for the chat/execution stream, and a server-side connection that mirrors the Gateway's agent list into SQLite (the [registry of record](/appendices/glossary), so the fleet survives the Gateway being down). Deploying an OpenClaw team from the dashboard then creates real OpenClaw agents and wires their routing, so they can delegate to each other over the Gateway.
## Next steps
* [Deploy and watch your first team collaborate](/getting-started/first-team)
* [Tour the dashboard: Atlas, Ghost Graph, and the view modes](/getting-started/dashboard-tour)
* [The OpenClaw runtime in depth: connections, channels, memory scope](/runtimes/openclaw)
* [System API reference: status, install, configure, gateway, device](/reference/rest-api/system)
* [Concept: the agent model and the five runtime classes](/concepts/agent-model)
Clawboo is free and open source. A star is the best way to support the project and helps other people find it.