> ## Documentation Index
> Fetch the complete documentation index at: https://docs.claw.boo/llms.txt
> Use this file to discover all available pages before exploring further.
# Dashboard tour
> A map of the Clawboo dashboard, the three-column shell, the view modes, Atlas vs the per-team Ghost Graph, and every nav panel.
The Clawboo dashboard is a single-page app with a stable three-column shell and one large content area that swaps between views. This page is a map: it walks the shell left-to-right (team sidebar, agent-list column, content area), explains the **view modes** that decide what fills the content area, and clarifies the one distinction newcomers trip on most: **Atlas** (the global, all-teams [Ghost Graph](/concepts/teams-and-planes)) versus the **per-team Ghost Graph** you see inside a team's group chat.
Read this after you've finished onboarding ([native](/getting-started/quickstart-native) or [OpenClaw](/getting-started/quickstart-openclaw)) and have at least one team. If the dashboard is empty, [deploy your first team](/getting-started/first-team) first.
## The shell
The app is three persistent columns plus a swappable content area:
```mermaid theme={"theme":{"light":"github-dark","dark":"github-dark"}}
flowchart LR
A["Team sidebar
(60px)
team icons + Boo Zero mascot"]
B["Agent-list column
(236px)
agents · Group Chat · global nav"]
C["Content area
(flex)
the active view"]
A --> B --> C
```
The team sidebar (column 1) and the content area (column 3) are always present. The agent-list column (column 2) is hidden in two cases: when you're in the standalone **Boo Zero** view, and when you collapse it with the sidebar's collapse toggle. The Boo Zero view dedicates the whole window to Boo Zero's agent detail, so the agent list, which is team-scoped, has nothing to show.
Widths are fixed: the team sidebar is 60px, the agent-list column is 236px. The content area takes the rest. There's no draggable shell divider; the only resizable seams are *inside* views (the agent detail panels, the group-chat graph/chat split).
### Team sidebar (column 1)
The leftmost strip is a Discord-style icon rail. Top to bottom:
* **The Boo Zero mascot** (the Clawboo logo). Clicking it deselects any team and opens the standalone **Boo Zero** view. [Boo Zero](/concepts/agent-model) is the universal team leader, teamless in the registry, but present in every team. Right-clicking the mascot offers "Show all agents," which clears the team filter and opens [Atlas](#atlas-vs-the-per-team-ghost-graph).
* **One icon per active team** (its emoji on its color). Clicking a team icon selects that team *and* opens its **group chat** directly, not Atlas. A Discord-style pill marks the selected team. Right-clicking a team icon opens a context menu: archive/unarchive, "Refresh Protocol" (regenerate each agent's routing file), "Delete team only" (orphan the agents), or "Delete with agents."
* **The "+" button** opens the Marketplace's **Teams** tab, the one place to browse and deploy a team or start one from scratch.
* **The collapse toggle** hides or shows the agent-list column.
Archived teams are filtered out of the rail; unarchive one from a team's context menu while it's still visible, or before archiving.
### Agent-list column (column 2)
This column is **team-scoped**: it shows the agents of the selected team (or all agents when no team is selected), filtered live by the search box. Top to bottom:
* **The team header**: the selected team's name (or "All Agents") plus the visible agent count.
* **The search box**: filters the agent list by name as you type.
* **The Group Chat row**: when a team is selected and has agents, a single row at the top of the list shows the team "photo" (a stack of up to four overlapping Boo avatars, leader first, with a "+N" badge for larger teams) and an aggregate team-status badge. Clicking it opens the team's [group chat](/concepts/peer-chat). It's styled to read as a peer of the agent rows beneath it, not a section header.
* **The agent rows**: each Boo with its avatar, name, a live status badge (Idle / Working / Error / Sleeping, with a fine-grained activity verb when running), and a "seen X ago" timestamp. Clicking a row opens that agent's detail view. A trash icon appears on hover to delete the agent.
* **Create Boo**: adds a new agent to the selected team (shown only when connected to a runtime that can create agents).
* **The global nav**: anchored to the bottom of the column. It holds the work surfaces you switch between most, plus a **Settings** gear and the theme toggle.
The sidebar nav is deliberately short, four work surfaces plus the Settings gear:
| Block | Item | View it opens |
| --------- | ----------------------- | ------------------------------------ |
| Primary | **Atlas** *(All Teams)* | The global Ghost Graph |
| Primary | **Board** | The durable kanban board |
| Primary | **Marketplace** | Browse 304 agents and 82 teams |
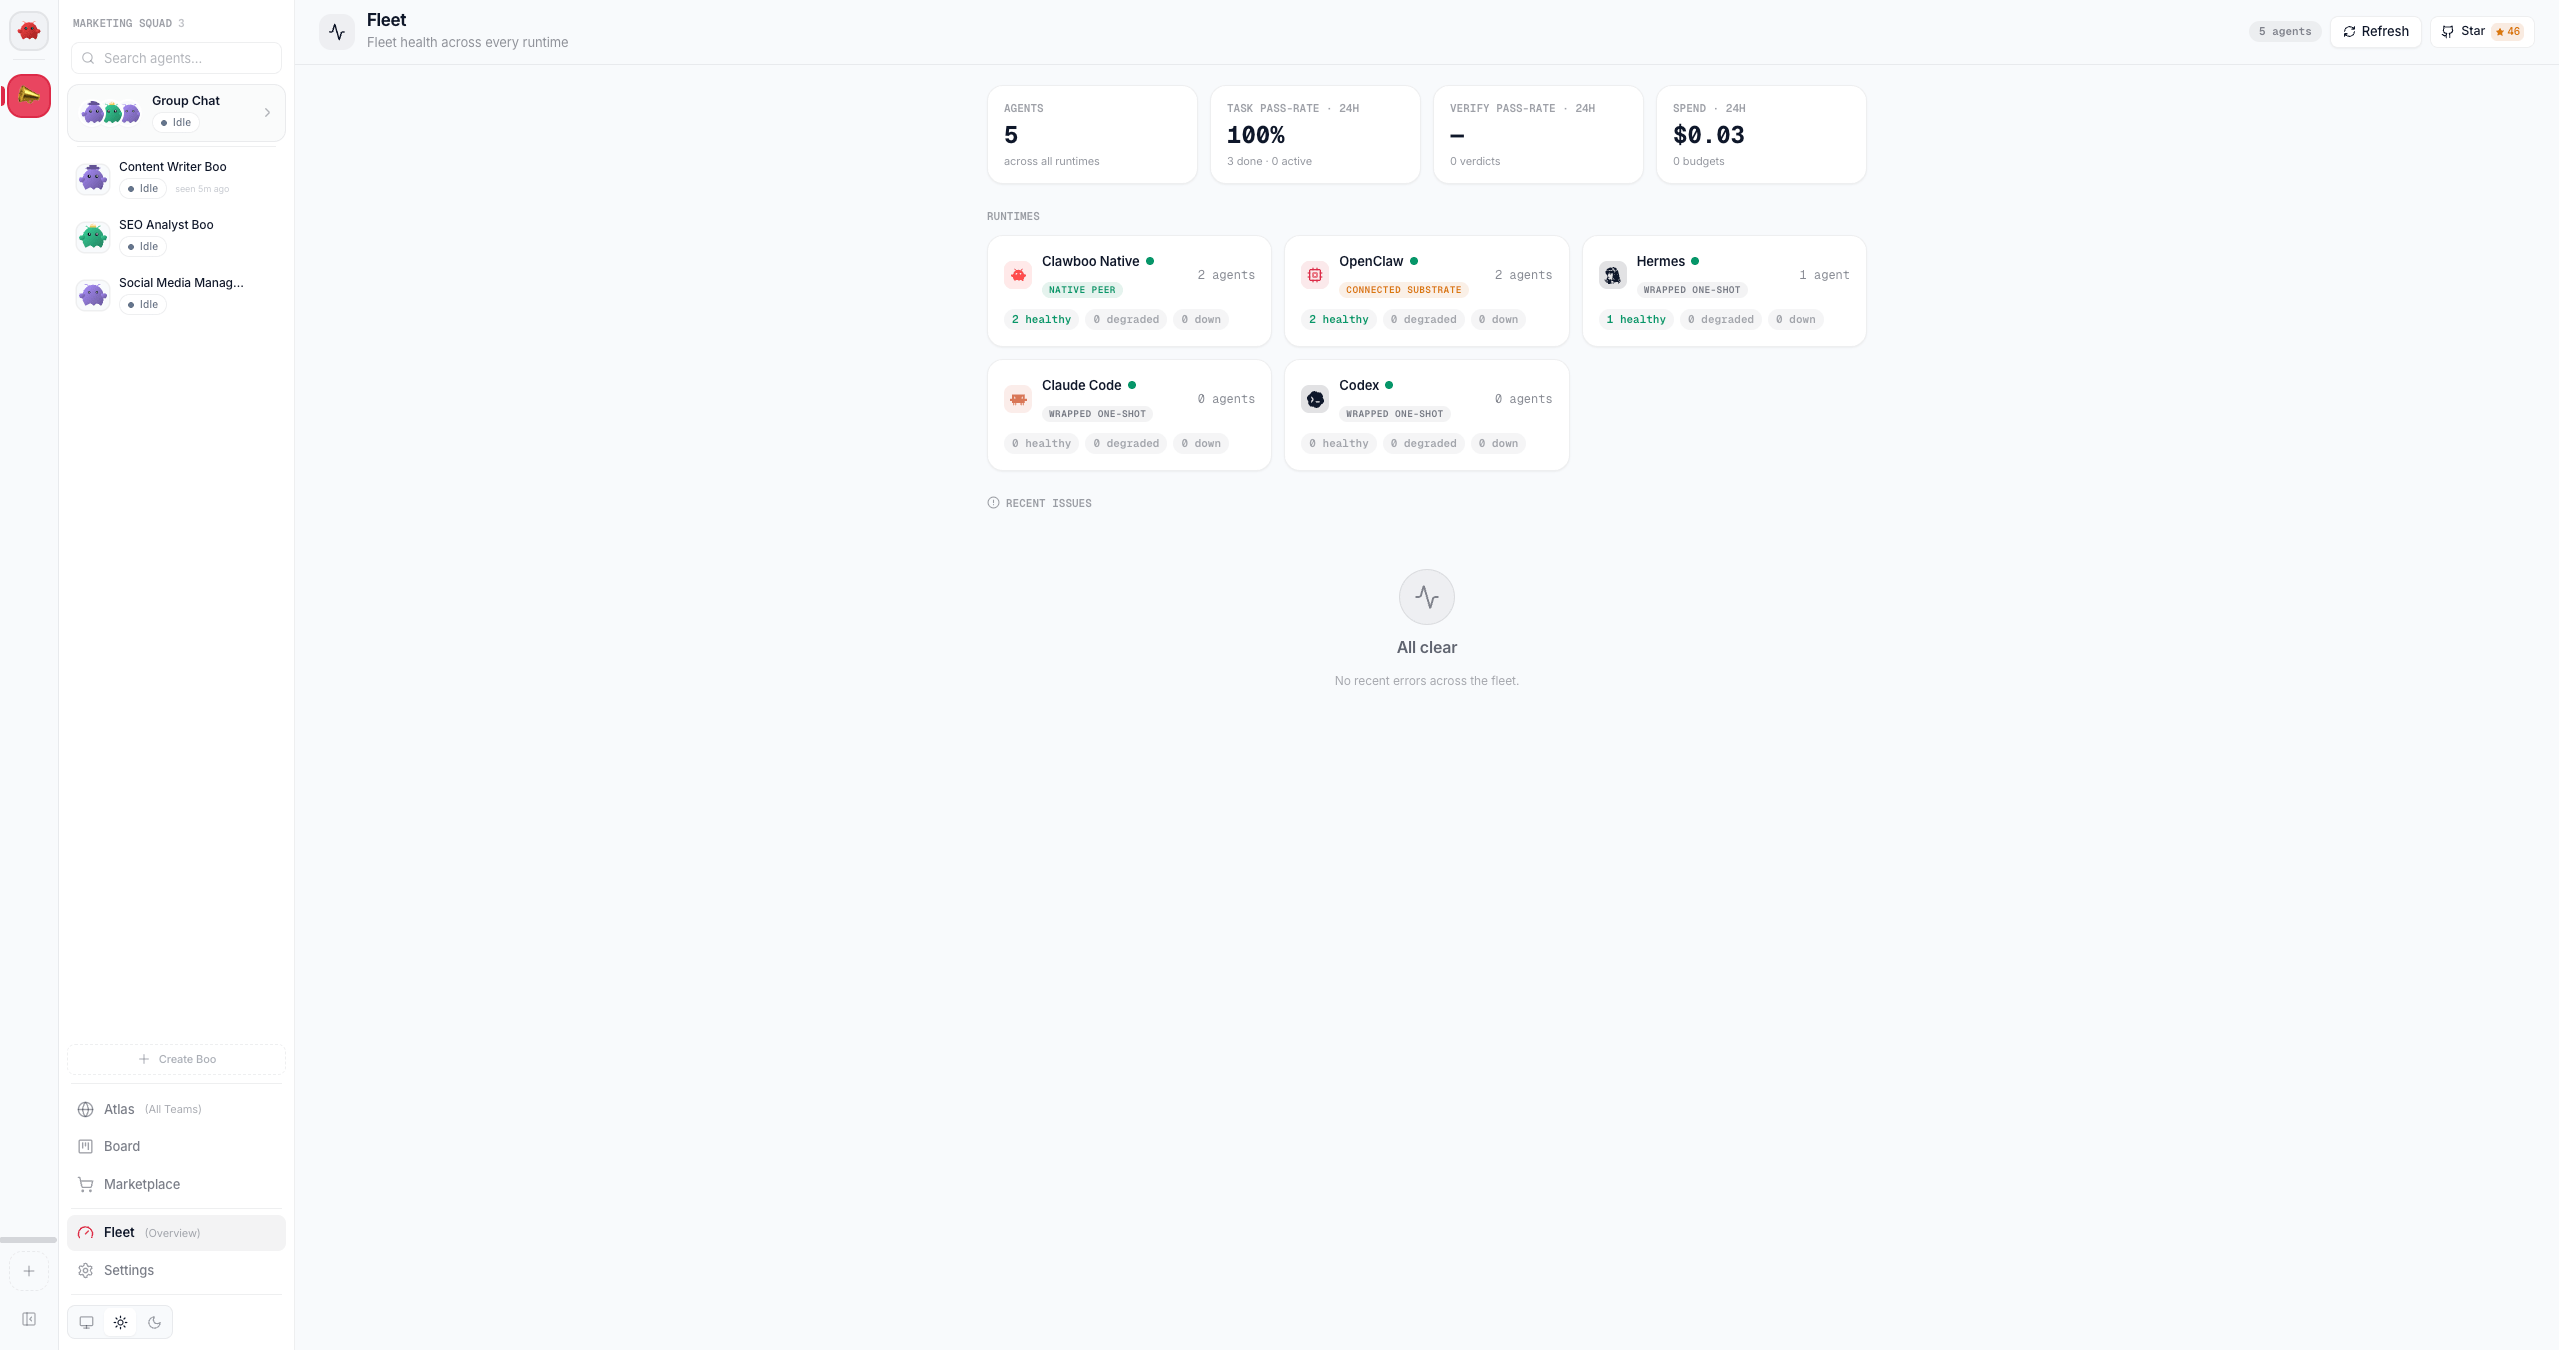
| Secondary | **Fleet** *(Overview)* | Fleet-health summary |
| Footer | **Settings** (gear) | Opens the Settings modal (see below) |
There is no standalone **Approvals** nav item. Approvals surface where they are raised: a collapsible **Needs approval** column on the [board](/using/board) and an inline tray above the [group-chat](/using/group-chat) composer. See [Approvals](/using/approvals).
The theme toggle sits beside the Settings gear at the bottom.
The **Fleet** view is the read-only overview of the whole fleet: agent count, 24-hour task and verify pass rates, spend, and per-runtime health.
 ### The Settings modal
Everything for managing, configuring, and inspecting the dashboard lives in a **Settings modal**, opened from the gear at the bottom of the sidebar or with **`Cmd/Ctrl + ,`**. It groups ten surfaces:
| Group | Item | What it shows |
| --------- | ----------------- | ----------------------------------- |
| Workspace | **Runtimes** | Connect/manage runtimes |
| Workspace | **Providers** | Connect/manage LLM provider keys |
| Workspace | **Memory** | Shared-memory browser |
| Workspace | **Capabilities** | The capability inventory |
| Workspace | **Scheduler** | Routines (scheduled team work) |
| Insights | **Tokens Used** | Cost dashboard |
| Insights | **Observability** | Traces, errors, fleet health, evals |
| Insights | **Governance** | Budgets, caps, audit, approvals |
| System | **System** | Gateway control, model, API keys |
| System | **System Health** | Boot probe + degradation checks |
### Content area (column 3)
The content area renders exactly one view at a time, chosen by the current **view mode** (see below). When you switch views, the old view fades out and the new one fades in. Pressing `Escape` from an agent, Boo Zero, or group-chat view returns you to the welcome screen.
## View modes
The dashboard's state is a single discriminated union, the `ViewMode`, and the content area is a `switch` over it. There are five shapes:
| View mode | What it shows | How you reach it |
| ----------- | ------------------------------------------------------------------ | ------------------------------------------------ |
| `welcome` | The welcome screen | `Escape` from a chat/agent view, or no selection |
| `agent` | An agent's three-panel detail view | Click an agent row |
| `booZero` | Boo Zero's detail view (column 2 hidden) | Click the mascot |
| `groupChat` | A team's group chat (graph + chat split) | Click a team icon or the Group Chat row |
| `nav` | One of the nav panels (4 in the sidebar, 10 in the Settings modal) | Click a nav item or a Settings item |
The `nav` mode carries a `view` field, one of the 14 `NAV_VIEWS`: `graph` (Atlas), `fleet`, `cost`, `marketplace`, `scheduler`, `system`, `obs`, `board`, `runtimes`, `providers`, `memory`, `governance`, `capabilities`, `health`. The dashboard opens on `nav: graph` (Atlas) by default, so a fresh launch lands you on the org-wide map.
### Keyboard navigation
* `Escape`: leave an agent / Boo Zero / group-chat view back to the welcome screen. Ignored while you're typing, or while any overlay is open — an open dialog, drawer, menu or dropdown takes `Escape` first, innermost one first, so dismissing a dropdown inside a dialog leaves the dialog (and anything you typed into it) alone.
* `Cmd/Ctrl + 1…4`: jump to a sidebar work surface, in this order: **1** Atlas, **2** Fleet, **3** Marketplace, **4** Board. (The shortcut order is the `NavView` order, which is not the visual order of the nav blocks.)
* `Cmd/Ctrl + ,`: open the Settings modal (Runtimes, Providers, Memory, Capabilities, Scheduler, Tokens Used, Observability, Governance, System, System Health).
## Atlas vs the per-team Ghost Graph
The single most useful thing to internalize: **the same Ghost Graph component renders at two scopes**, and which one you're looking at depends on how you got there.
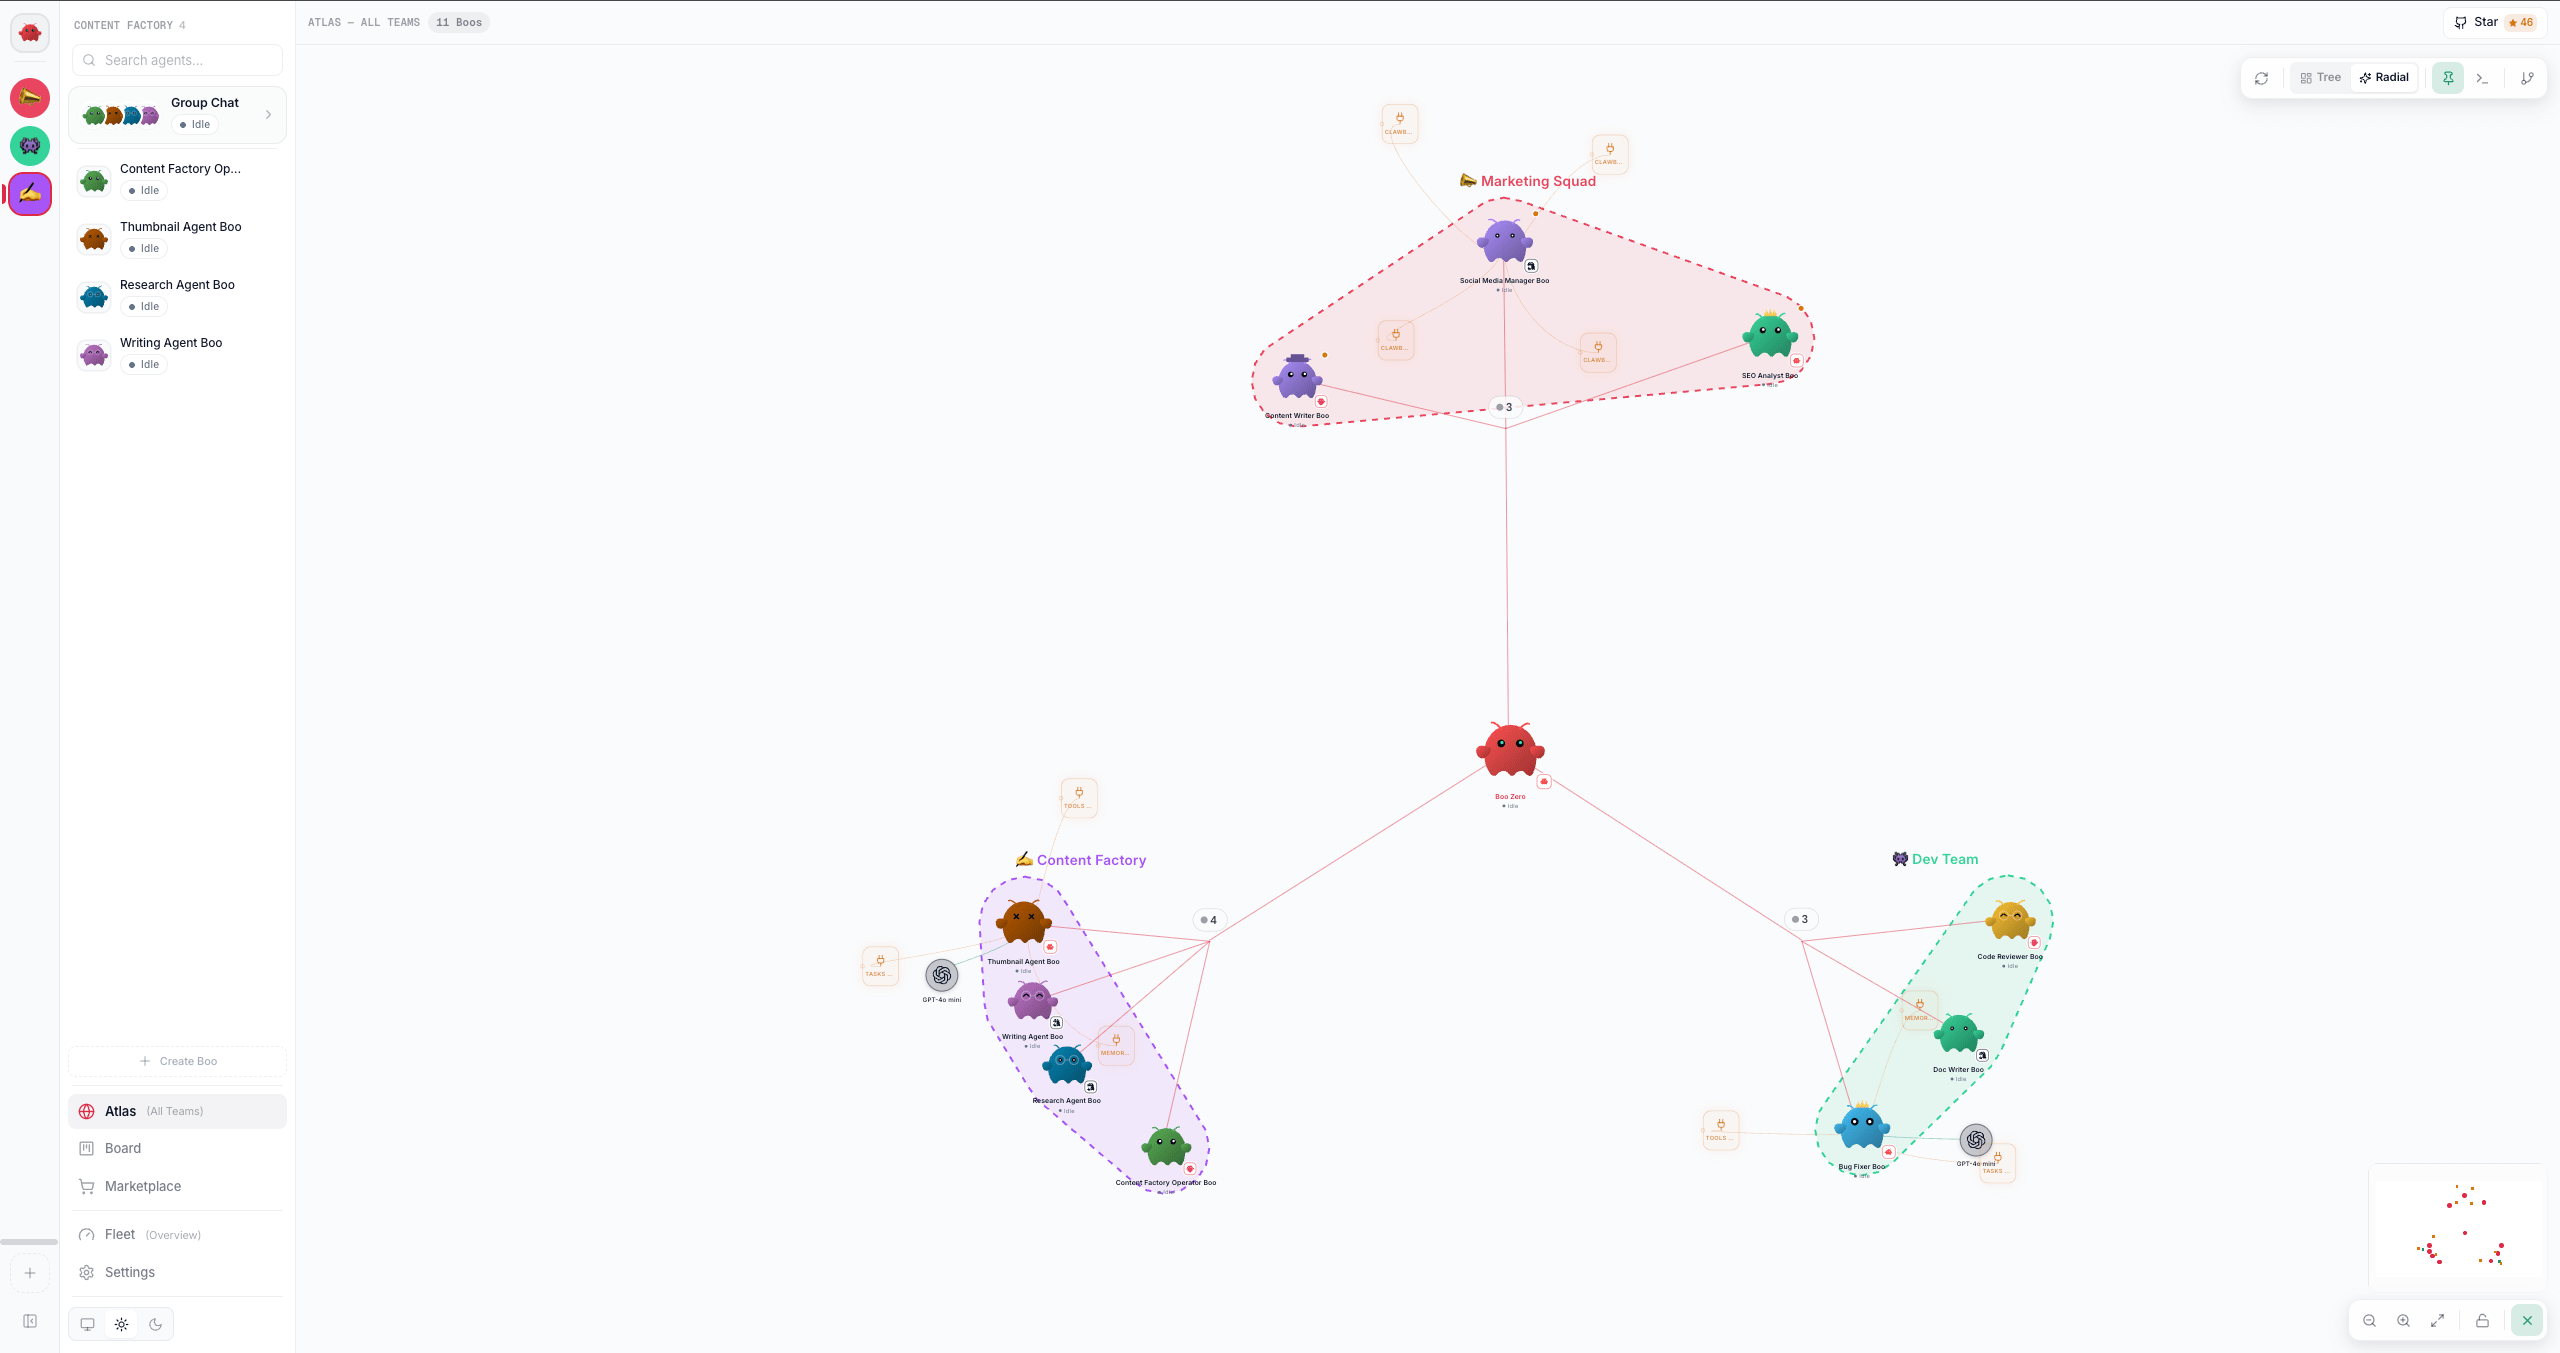
* **Atlas** is the Ghost Graph at **`atlas` scope**. It ignores the selected team and pulls *every* agent onto one canvas, with each team clustered around a presiding Boo Zero (the default radial layout; a Tree/Radial toggle switches to a top-down hierarchy with each team laid out as a row). Reach it from the **Atlas** nav item (column 2) or the mascot's "Show all agents." This is the org-wide map, every team at once.
* **The per-team Ghost Graph** is the same component at the default **`team` scope**, embedded inside a team's group-chat view. It filters to the selected team's agents (plus Boo Zero) and renders that team's internal routing as a top-down org chart. You don't navigate to it separately; it's the top half of the group-chat split.
So: **Atlas is a nav destination; the per-team Ghost Graph is part of a team's group chat.** They share rendering, hover cascades, team halos, and the peacock skill-expand interaction, but Atlas is scoped to all teams while the embedded graph is scoped to one. The Atlas nav item and its keyboard shortcut both open Atlas.
### The Settings modal
Everything for managing, configuring, and inspecting the dashboard lives in a **Settings modal**, opened from the gear at the bottom of the sidebar or with **`Cmd/Ctrl + ,`**. It groups ten surfaces:
| Group | Item | What it shows |
| --------- | ----------------- | ----------------------------------- |
| Workspace | **Runtimes** | Connect/manage runtimes |
| Workspace | **Providers** | Connect/manage LLM provider keys |
| Workspace | **Memory** | Shared-memory browser |
| Workspace | **Capabilities** | The capability inventory |
| Workspace | **Scheduler** | Routines (scheduled team work) |
| Insights | **Tokens Used** | Cost dashboard |
| Insights | **Observability** | Traces, errors, fleet health, evals |
| Insights | **Governance** | Budgets, caps, audit, approvals |
| System | **System** | Gateway control, model, API keys |
| System | **System Health** | Boot probe + degradation checks |
### Content area (column 3)
The content area renders exactly one view at a time, chosen by the current **view mode** (see below). When you switch views, the old view fades out and the new one fades in. Pressing `Escape` from an agent, Boo Zero, or group-chat view returns you to the welcome screen.
## View modes
The dashboard's state is a single discriminated union, the `ViewMode`, and the content area is a `switch` over it. There are five shapes:
| View mode | What it shows | How you reach it |
| ----------- | ------------------------------------------------------------------ | ------------------------------------------------ |
| `welcome` | The welcome screen | `Escape` from a chat/agent view, or no selection |
| `agent` | An agent's three-panel detail view | Click an agent row |
| `booZero` | Boo Zero's detail view (column 2 hidden) | Click the mascot |
| `groupChat` | A team's group chat (graph + chat split) | Click a team icon or the Group Chat row |
| `nav` | One of the nav panels (4 in the sidebar, 10 in the Settings modal) | Click a nav item or a Settings item |
The `nav` mode carries a `view` field, one of the 14 `NAV_VIEWS`: `graph` (Atlas), `fleet`, `cost`, `marketplace`, `scheduler`, `system`, `obs`, `board`, `runtimes`, `providers`, `memory`, `governance`, `capabilities`, `health`. The dashboard opens on `nav: graph` (Atlas) by default, so a fresh launch lands you on the org-wide map.
### Keyboard navigation
* `Escape`: leave an agent / Boo Zero / group-chat view back to the welcome screen. Ignored while you're typing, or while any overlay is open — an open dialog, drawer, menu or dropdown takes `Escape` first, innermost one first, so dismissing a dropdown inside a dialog leaves the dialog (and anything you typed into it) alone.
* `Cmd/Ctrl + 1…4`: jump to a sidebar work surface, in this order: **1** Atlas, **2** Fleet, **3** Marketplace, **4** Board. (The shortcut order is the `NavView` order, which is not the visual order of the nav blocks.)
* `Cmd/Ctrl + ,`: open the Settings modal (Runtimes, Providers, Memory, Capabilities, Scheduler, Tokens Used, Observability, Governance, System, System Health).
## Atlas vs the per-team Ghost Graph
The single most useful thing to internalize: **the same Ghost Graph component renders at two scopes**, and which one you're looking at depends on how you got there.
* **Atlas** is the Ghost Graph at **`atlas` scope**. It ignores the selected team and pulls *every* agent onto one canvas, with each team clustered around a presiding Boo Zero (the default radial layout; a Tree/Radial toggle switches to a top-down hierarchy with each team laid out as a row). Reach it from the **Atlas** nav item (column 2) or the mascot's "Show all agents." This is the org-wide map, every team at once.
* **The per-team Ghost Graph** is the same component at the default **`team` scope**, embedded inside a team's group-chat view. It filters to the selected team's agents (plus Boo Zero) and renders that team's internal routing as a top-down org chart. You don't navigate to it separately; it's the top half of the group-chat split.
So: **Atlas is a nav destination; the per-team Ghost Graph is part of a team's group chat.** They share rendering, hover cascades, team halos, and the peacock skill-expand interaction, but Atlas is scoped to all teams while the embedded graph is scoped to one. The Atlas nav item and its keyboard shortcut both open Atlas.
 ## The agent detail view
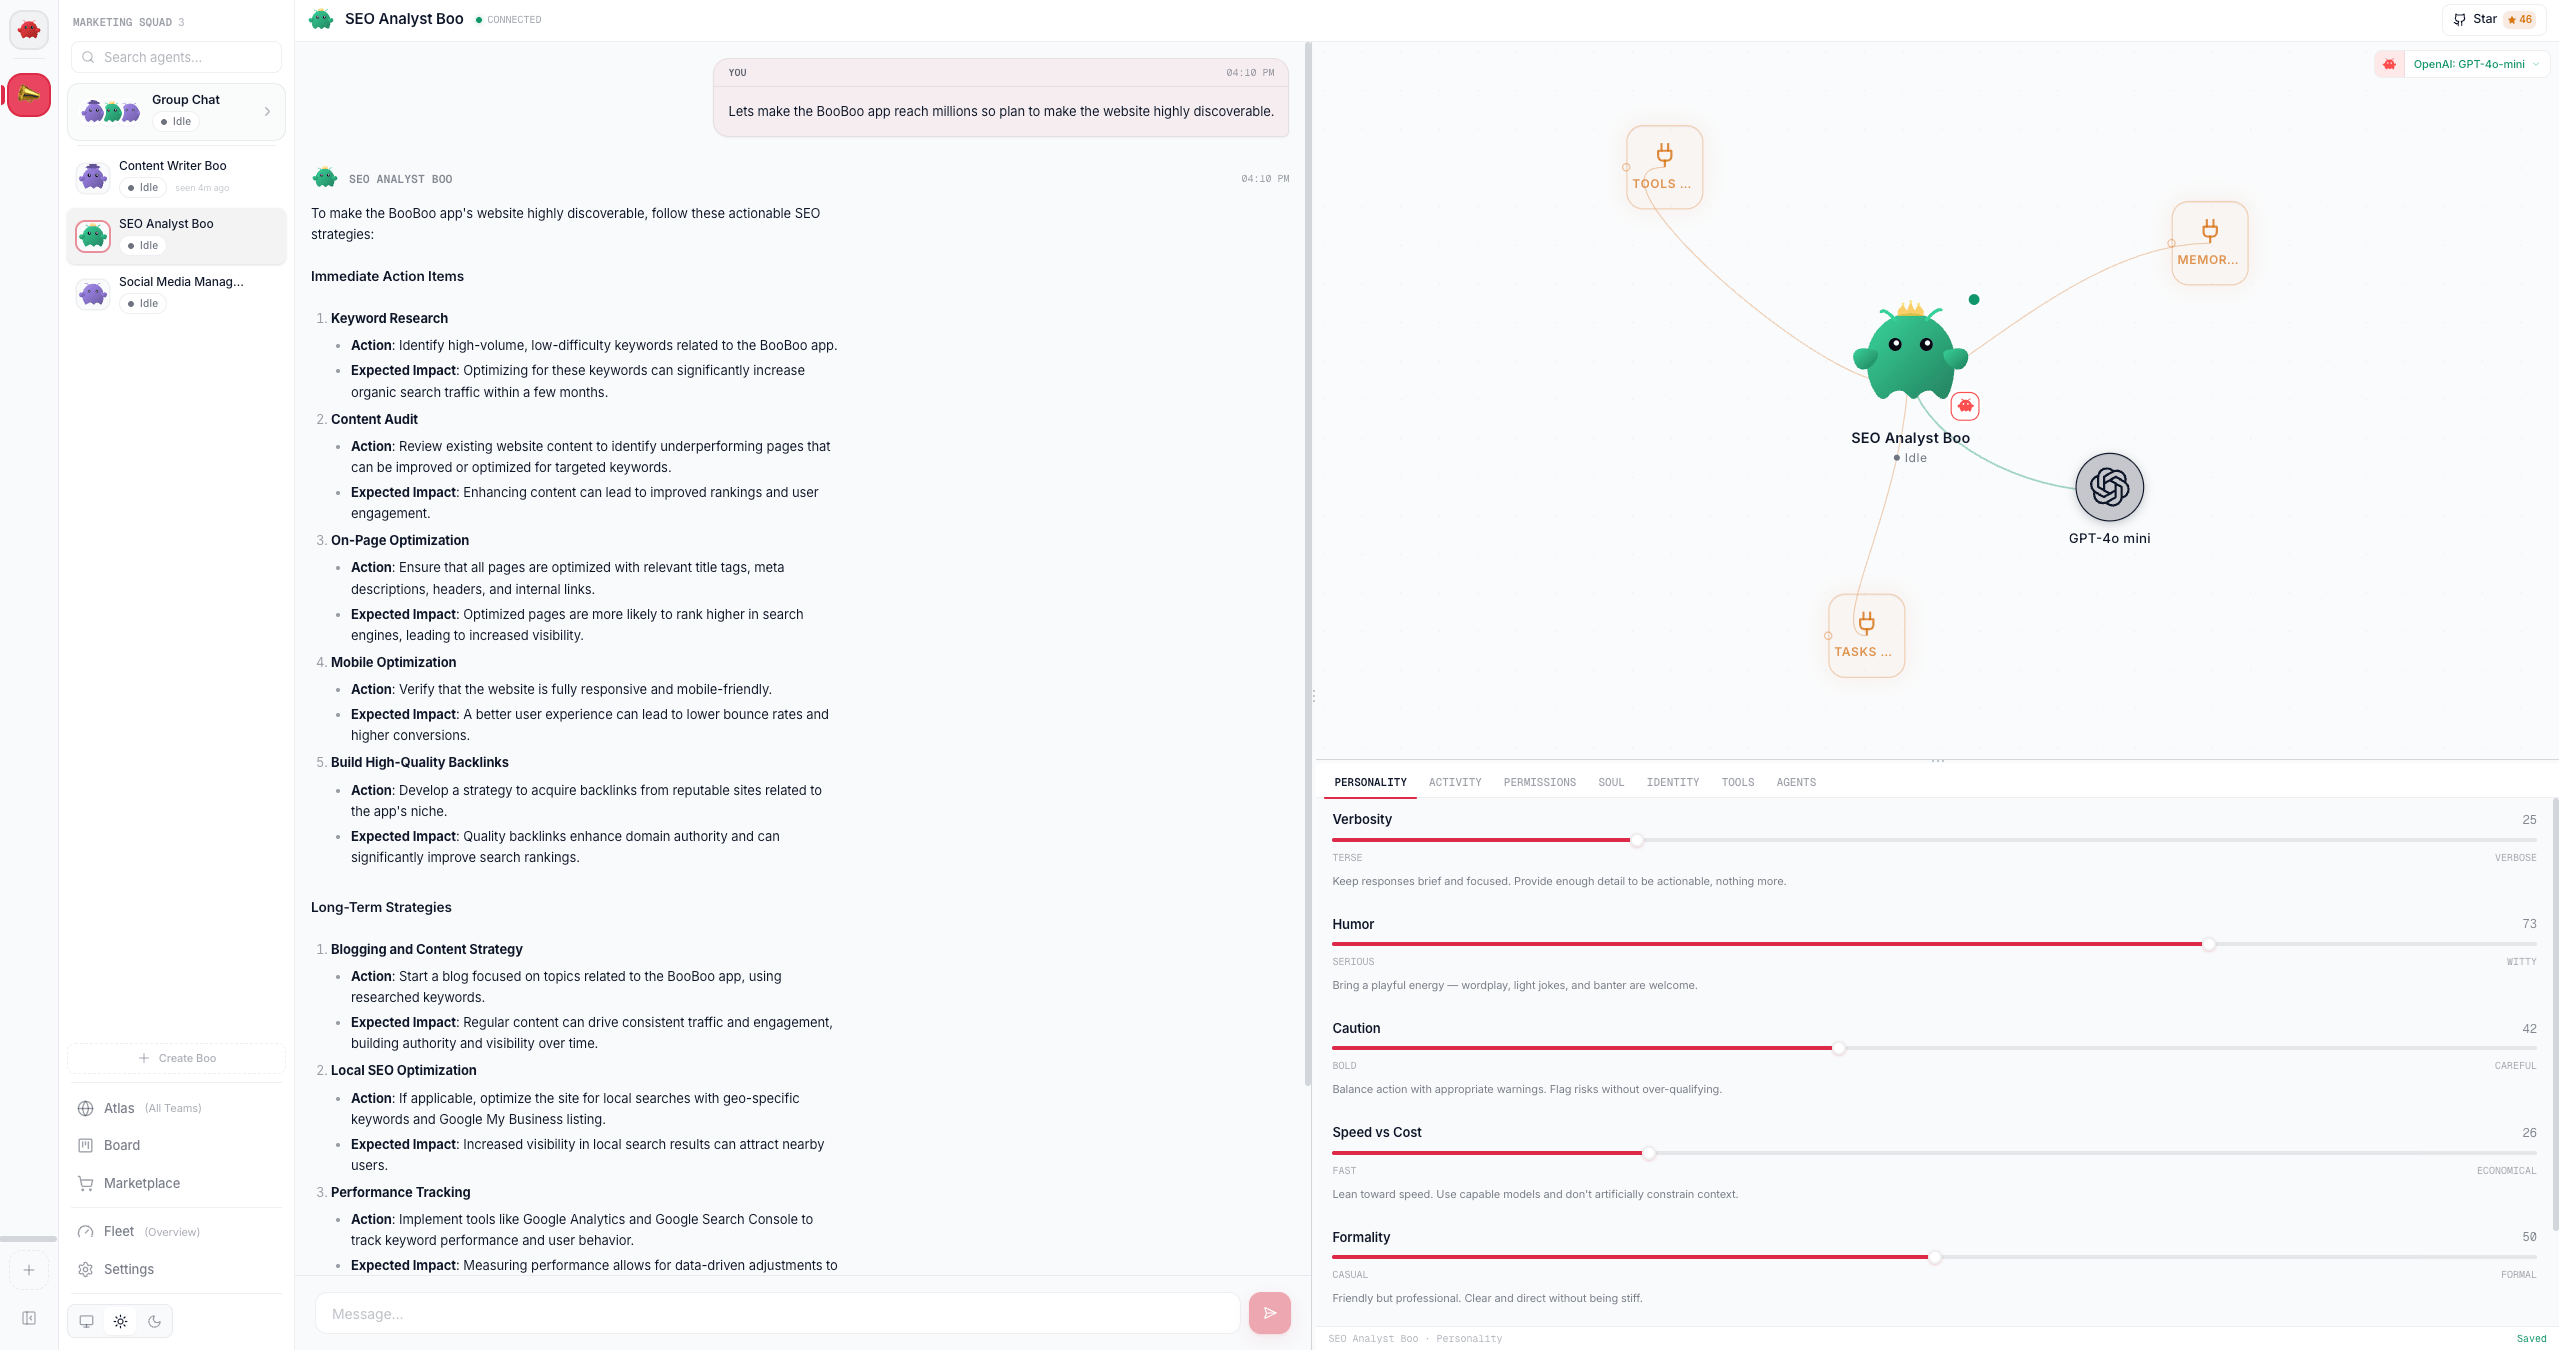
Clicking an agent opens a three-panel detail view: a chat panel on the left, a single-agent compact graph (its Boo, skills, and resources) top-right, and an inline editor bottom-right with tabs for personality sliders and the four agent files (SOUL.md, IDENTITY.md, TOOLS.md, AGENTS.md). The panels are resizable; their sizes reset to the defaults (45/55 horizontally, 55/45 in the right-hand stack) on reload.
## The agent detail view
Clicking an agent opens a three-panel detail view: a chat panel on the left, a single-agent compact graph (its Boo, skills, and resources) top-right, and an inline editor bottom-right with tabs for personality sliders and the four agent files (SOUL.md, IDENTITY.md, TOOLS.md, AGENTS.md). The panels are resizable; their sizes reset to the defaults (45/55 horizontally, 55/45 in the right-hand stack) on reload.
 ## Where to go from here
* Click a **team icon** to open its group chat and watch the team collaborate.
* Open **Atlas** to see how all your teams relate under Boo Zero.
* Open the **Board** to see delegated work as durable, claimable tasks.
* Open **Settings**, then **Runtimes**, to connect Claude Code, Codex, Hermes, or OpenClaw alongside the native runtime.
## See also
* [Deploy your first team](/getting-started/first-team), get a team on screen, then come back to this map
* [Teams and planes](/concepts/teams-and-planes), what a team is, shared vs private plane
* [The board](/concepts/the-board), the durable substrate beneath the Board view
* [Peer chat](/concepts/peer-chat), what happens inside a team's group chat
* [Agent model](/concepts/agent-model), Boo, Boo Zero, and the runtime classes
* [Connecting runtimes](/runtimes/connecting-runtimes), what the Runtimes view manages
* [Glossary](/appendices/glossary), canonical term definitions
## Where to go from here
* Click a **team icon** to open its group chat and watch the team collaborate.
* Open **Atlas** to see how all your teams relate under Boo Zero.
* Open the **Board** to see delegated work as durable, claimable tasks.
* Open **Settings**, then **Runtimes**, to connect Claude Code, Codex, Hermes, or OpenClaw alongside the native runtime.
## See also
* [Deploy your first team](/getting-started/first-team), get a team on screen, then come back to this map
* [Teams and planes](/concepts/teams-and-planes), what a team is, shared vs private plane
* [The board](/concepts/the-board), the durable substrate beneath the Board view
* [Peer chat](/concepts/peer-chat), what happens inside a team's group chat
* [Agent model](/concepts/agent-model), Boo, Boo Zero, and the runtime classes
* [Connecting runtimes](/runtimes/connecting-runtimes), what the Runtimes view manages
* [Glossary](/appendices/glossary), canonical term definitions